📚 Table of Contents
- Introduction
- Why Docker Images Exist
- Real World Story
- What is a Docker Image?
- Image vs Container
- How Docker Images Work
- Docker Image Architecture
- Docker Image Layers
- Docker Hub
- docker pull Behind the Scenes
- Essential Docker Image Commands
- Image Inspection
- Image Size Optimization
- Production Best Practices
- Common Mistakes
- Interview Questions
- Cheat Sheet
- Summary
- What's Next
🚀 Introduction
Imagine this scenario...
You just joined a software company as a DevOps Engineer.
Your manager walks up to your desk and says:
"Hey, we need you to deploy our payment application to production today."
You respond enthusiastically:
"Sure! Can you share the application files?"
In a traditional setup, the developer would send you:
- ☕ Java JDK 21
- 📦 Maven 3.9
- 🟢 Node.js 20.x
- 🐍 Python 3.11
- 🔴 Redis 7.2
- 🐘 PostgreSQL 16
- 🌐 Nginx 1.27
- 📄 50+ Configuration Files
- 🔧 Environment Variables
- 📚 Installation Guides
You'd spend hours or even days setting everything up.
But instead, the developer simply sends:
mycompany/payment-api:v3.2That's it. One single line.
Within seconds, your entire application is ready to run.
How is this possible?
Because Docker Images package everything your application needs into one portable, self-contained unit.
In this comprehensive guide, you'll learn:
- ✅ What Docker Images actually are
- ✅ How they work internally
- ✅ The magic of layered file systems
- ✅ How to optimize images for production
- ✅ Best practices used by top companies
- ✅ Interview questions with answers
Let's dive in! 🏊♂️
🤔 Why Docker Images Exist
Before Docker, deploying applications was a nightmare.
The Old Way (Pre-Docker Era)
Scenario: You're deploying a web application.
Developer's Machine:
- Ubuntu 20.04
- Python 3.8
- Django 3.2
- PostgreSQL 12
Staging Server:
- Ubuntu 18.04
- Python 3.7
- Django 3.1
- PostgreSQL 11
Production Server:
- CentOS 7
- Python 3.6
- Django 2.2
- PostgreSQL 10
The Result?
"It works on my machine!" 😤
This became the most frustrating phrase in software development.
Problems with Traditional Deployment:
| Problem | Impact |
|---|---|
| Dependency Hell | Different versions cause conflicts |
| Environment Inconsistency | Dev, staging, and production differ |
| Manual Setup | Hours wasted on configuration |
| Documentation Drift | Setup guides become outdated |
| Onboarding Nightmare | New developers spend days setting up |
| Scaling Issues | Hard to replicate environments |
The Docker Solution
Docker Images solve all these problems by:
- 📦 Packaging everything together
- 🔒 Isolating applications from the host
- 🚀 Ensuring consistency across all environments
- ⚡ Enabling rapid deployment
- 🔄 Simplifying scaling and replication
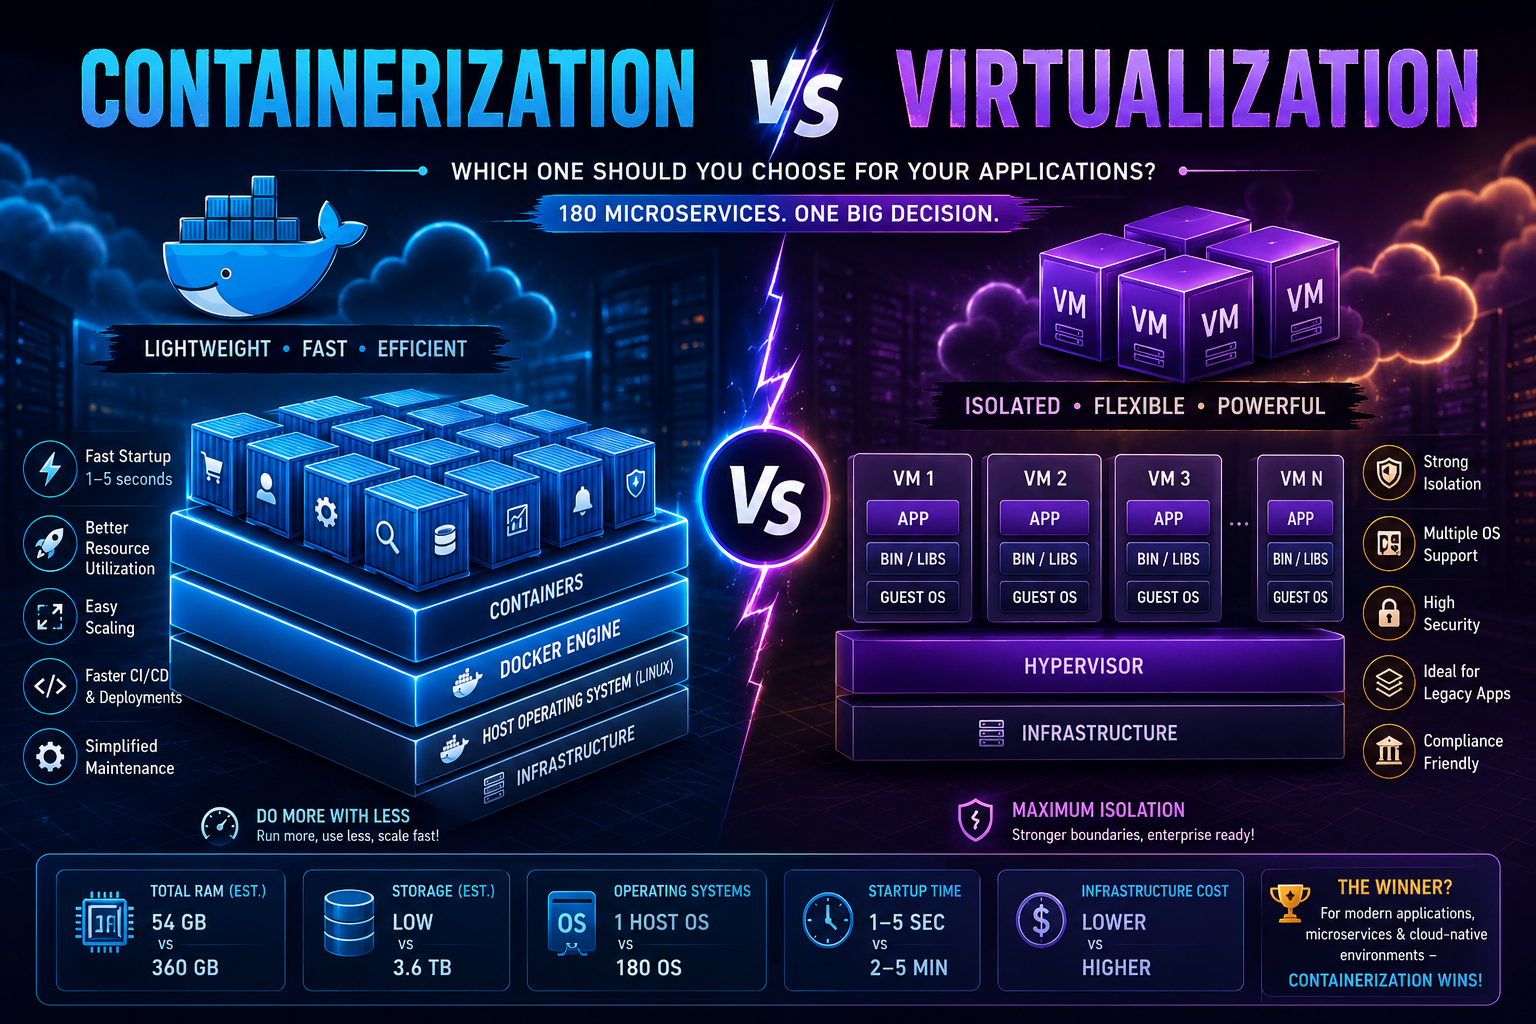
🏢 Real-World Story
Let me share a real story from a company I worked with.
The Problem
Company: TechCart (E-commerce Platform)
Team Size: 50 Developers
Architecture: 180 Microservices
Their microservices included:
├── User Service (Java + Spring Boot) ├── Product Service (Node.js + Express) ├── Order Service (Python + Flask) ├── Payment Service (Go) ├── Notification Service (Python + Celery) ├── Authentication Service (Java) ├── API Gateway (Nginx) ├── Search Service (Elasticsearch) ├── Cache Layer (Redis) ├── Message Queue (RabbitMQ) └── Database (PostgreSQL, MongoDB)Before Docker
New developer onboarding took 3-5 days:
- Install Java 11, 17, and 21 (different services used different versions)
- Install Node.js 16, 18, and 20
- Install Python 3.8, 3.9, 3.11
- Install Go 1.21
- Install PostgreSQL
- Install MongoDB
- Install Redis
- Install RabbitMQ
- Install Elasticsearch
- Configure environment variables for 180 services
- Run database migrations
- Pray everything works 🙏
Deployment to production:
- Took 2-3 hours per service
- Required detailed runbooks
- Often failed due to environment differences
- Rollbacks were painful
After Docker
New developer onboarding:
git clone company-repo docker-compose upTime: 15 minutes ⚡
Deployment to production:
docker pull techcart/payment-service:v3.2 docker run -d techcart/payment-service:v3.2Time: 30 seconds ⚡
Result:
- 🎯 95% reduction in deployment time
- 🎯 99.9% environment consistency
- 🎯 Zero "works on my machine" issues
- 🎯 New developers productive on day one
📦 What is a Docker Image?
A Docker Image is a read-only template that contains everything needed to run an application.
What's Inside a Docker Image?
┌─────────────────────────────────────┐ │ Docker Image Contents │ ├─────────────────────────────────────┤ │ 1. Operating System (Ubuntu/Alpine) │ │ 2. Runtime (Java/Node/Python) │ │ 3. Application Code │ │ 4. Libraries & Dependencies │ │ 5. Environment Variables │ │ 6. Configuration Files │ │ 7. Startup Commands │ │ 8. Metadata │ └─────────────────────────────────────┘Real Example: Nginx Image
When you download the nginx image, you get:
- ✅ Linux base system
- ✅ Nginx web server (pre-installed and configured)
- ✅ All required libraries
- ✅ Default configuration
- ✅ Startup command
The Cake Analogy 🍰
Think of it like baking a cake:
| Baking | Docker |
|---|---|
| Recipe | Docker Image |
| Baked Cake | Docker Container |
| Ingredients | Dependencies |
| Oven | Docker Engine |
- The recipe (image) can be used multiple times
- Each time you bake, you get a new cake (container)
- The recipe itself doesn't change (read-only)
- You can share the recipe with others
Key Characteristics
| Property | Description |
|---|---|
| Read-Only | Cannot be modified once created |
| Immutable | Always produces the same result |
| Portable | Works on any system with Docker |
| Layered | Built from multiple layers |
| Reusable | Can create unlimited containers |
| Shareable | Can be pushed to registries |
⚖️ Image vs Container
This is one of the most important concepts in Docker.
The Fundamental Difference
Docker Image → Blueprint/Template (Static) Docker Container → Running Instance (Dynamic)Detailed Comparison
| Aspect | Docker Image | Docker Container |
|---|---|---|
| Nature | Read-only template | Running instance |
| State | Static | Dynamic |
| Execution | Cannot execute code | Executes application |
| Modification | Immutable | Can be modified (temporarily) |
| Storage | Stored in registry | Runs in memory |
| Lifespan | Permanent until deleted | Temporary |
| Quantity | One image | Many containers from one image |
| Size | Fixed | Adds writable layer |
Real-World Analogy
Think of a Class vs Object in Programming:
# Docker Image = Class Definition class WebServer: def __init__(self): self.port = 80 self.status = "ready" # Docker Containers = Objects/Instances container1 = WebServer() # Running on port 80 container2 = WebServer() # Running on port 8080 container3 = WebServer() # Running on port 8081Visual Representation
nginx:latest (Image) │ │ docker run │ ┌──────────────┼──────────────┐ │ │ │ ▼ ▼ ▼ Container 1 Container 2 Container 3 (Port 80) (Port 8080) (Port 8081) Running Running StoppedPractical Example
# Pull an image (download the blueprint) docker pull nginx # Create multiple containers from the same image docker run -d -p 80:80 --name web1 nginx docker run -d -p 8080:80 --name web2 nginx docker run -d -p 8081:80 --name web3 nginx # Now you have: # - 1 Image (nginx) # - 3 Running Containers (web1, web2, web3)🔧 How Docker Images Work
Let's understand the internal mechanics.
The Docker Image Workflow
1. Developer writes Dockerfile ↓ 2. Docker builds image (layer by layer) ↓ 3. Image stored locally or pushed to registry ↓ 4. User pulls image from registry ↓ 5. Docker Engine stores image locally ↓ 6. User runs image → Creates container ↓ 7. Container executes applicationWhere Are Images Stored?
On Your Machine:
- Linux:
/var/lib/docker/ - Windows:
C:\ProgramData\Docker\ - Mac:
~/Library/Containers/com.docker.docker/
In Registries:
- Docker Hub (public)
- Amazon ECR (AWS)
- Google Container Registry (GCP)
- Azure Container Registry (Azure)
- Private registries (Harbor, Nexus)
Image Naming Convention
[registry]/[repository]:[tag] Examples: docker.io/library/nginx:1.27 └─┬──┘ └──┬──┘ └─┬─┘ └┬─┘ │ │ │ └─── Version tag │ │ └──────── Image name │ └─────────────── Namespace/User └─────────────────────── Registry (default: docker.io)🏗 Docker Image Architecture
High-Level Architecture
┌─────────────────┐ │ Docker Hub │ │ (Registry) │ └────────┬────────┘ │ docker pull/push │ ┌────────▼────────┐ │ Docker Image │ │ (Read-Only) │ └────────┬────────┘ │ Multiple Layers │ ┌────────▼────────┐ │ Docker Engine │ └────────┬────────┘ │ ┌────────▼────────┐ │ Container Layer │ │ (Writable) │ └────────┬────────┘ │ ┌────────▼────────┐ │ Running │ │ Application │ └─────────────────┘Layer Architecture
Container (Writable Layer) ═══════════════════════════ Image Layer 5: CMD ["nginx"] ─────────────────────────── Image Layer 4: COPY app /usr/share/nginx/html ─────────────────────────── Image Layer 3: RUN apt-get install -y nginx ─────────────────────────── Image Layer 2: RUN apt-get update ─────────────────────────── Image Layer 1: FROM ubuntu:22.04 ═══════════════════════════🧱 Docker Image Layers (The Secret Sauce)
This is where Docker's magic happens.
What Are Layers?
Each instruction in a Dockerfile creates a new layer.
Example Dockerfile:
FROM ubuntu:22.04 # Layer 1 RUN apt-get update # Layer 2 RUN apt-get install -y nginx # Layer 3 COPY index.html /var/www/html/ # Layer 4 CMD ["nginx", "-g", "daemon off;"] # Layer 5Layer Visualization
┌─────────────────────────────────┐ │ Layer 5: CMD │ ← 0.5 KB ├─────────────────────────────────┤ │ Layer 4: COPY index.html │ ← 2 KB ├─────────────────────────────────┤ │ Layer 3: Install Nginx │ ← 50 MB ├─────────────────────────────────┤ │ Layer 2: apt-get update │ ← 30 MB ├─────────────────────────────────┤ │ Layer 1: Ubuntu Base │ ← 77 MB └─────────────────────────────────┘ Total: ~159 MBWhy Layers Are Brilliant
1. Layer Caching
# First build FROM ubuntu:22.04 # Downloads 77 MB RUN apt-get update # Downloads 30 MB RUN apt-get install nginx # Downloads 50 MB COPY app.js /app/ # Copies 2 KB # Second build (only app.js changed) FROM ubuntu:22.04 # ✅ Cached (0 MB) RUN apt-get update # ✅ Cached (0 MB) RUN apt-get install nginx # ✅ Cached (0 MB) COPY app.js /app/ # ⚡ Only this rebuilds (2 KB)2. Layer Sharing
Image 1: nginx:latest ├── ubuntu:22.04 (77 MB) ├── nginx (50 MB) └── config (1 MB) Image 2: custom-app ├── ubuntu:22.04 (77 MB) ← SHARED! ├── python (100 MB) └── app code (5 MB) Total storage: 77 + 50 + 1 + 100 + 5 = 233 MB (Not 77+50+1+77+100+5 = 310 MB)3. Faster Downloads
When you pull an image, Docker only downloads layers you don't have.
docker pull nginx:1.27 # Output: 1.27: Pulling from library/nginx a1b2c3d4e5f6: Already exists ← Skipped b2c3d4e5f6g7: Pull complete ← Downloaded c3d4e5f6g7h8: Pull complete ← DownloadedBenefits of Layers
| Benefit | Impact |
|---|---|
| Faster Builds | Only changed layers rebuild |
| Efficient Storage | Shared layers stored once |
| Faster Downloads | Only new layers downloaded |
| Version Control | Each layer is tracked |
| Smaller Updates | Only delta is transferred |
🏪 Docker Hub
Docker Hub is the world's largest container registry.
What is Docker Hub?
Think of Docker Hub as:
- GitHub for Docker Images
- App Store for containers
- NPM for Docker
Docker Hub Statistics (2026)
- 📊 10+ million repositories
- 📊 100+ billion image pulls
- 📊 15+ million developers
- 📊 Official images for 100+ technologies
Popular Official Images
| Image | Purpose | Pulls |
|---|---|---|
| Web server | 1B+ |
| Base OS | 1B+ |
| Cache | 1B+ |
| Database | 1B+ |
| JavaScript runtime | 1B+ |
| Python runtime | 1B+ |
| Database | 1B+ |
| NoSQL database | 500M+ |
Image Naming on Docker Hub
# Official images (maintained by Docker) docker pull nginx docker pull ubuntu docker pull redis # User/Organization images docker pull username/myapp docker pull company/api-service # With version tags docker pull nginx:1.27 docker pull python:3.11-alpine docker pull node:20-slimTags Explained
# Latest version (not recommended for production) docker pull nginx:latest # Specific version (recommended) docker pull nginx:1.27 # Specific version with variant docker pull python:3.11-alpine # Minimal size docker pull python:3.11-slim # Smaller size docker pull python:3.11 # Full versionSearching Docker Hub
# Search from command line docker search nginx # Output: NAME DESCRIPTION STARS OFFICIAL nginx Official build of Nginx 19000 [OK] jwilder/nginx-proxy Automated nginx proxy 2100