Docker Made Easy: A Step-by-Step Installation Guide for Beginners

  • Home
  • Blog
  • Docker Made Easy: A Step-by-Step Installation Guide for Beginners
Learning By Kartikeya rajulapati 07 Jun 2026 06:59 PM
Docker Made Easy: A Step-by-Step Installation Guide for Beginners
Ready to dive into the world of containers? Learn how to install Docker on Ubuntu, Windows, and macOS with these simple, foolproof steps and get your first container running in minutes!

Containers have completely transformed how we build, ship, and run applications. At the heart of this revolution is Docker. If you are tired of the classic "it works on my machine" excuse, Docker is the solution you've been looking for.

In this guide, we will walk through the easiest way to install Docker on your machine so you can start containerizing your projects immediately.

1. Prerequisites

Before jumping into the installation, ensure your system meets these basic requirements:

  • A user account with sudo privileges (for Linux users).

  • WSL 2 (Windows Subsystem for Linux) enabled if you are on Windows.

  • An internet connection to download the packages.

2. Step-by-Step Installation

Choose the section that matches your operating system below.

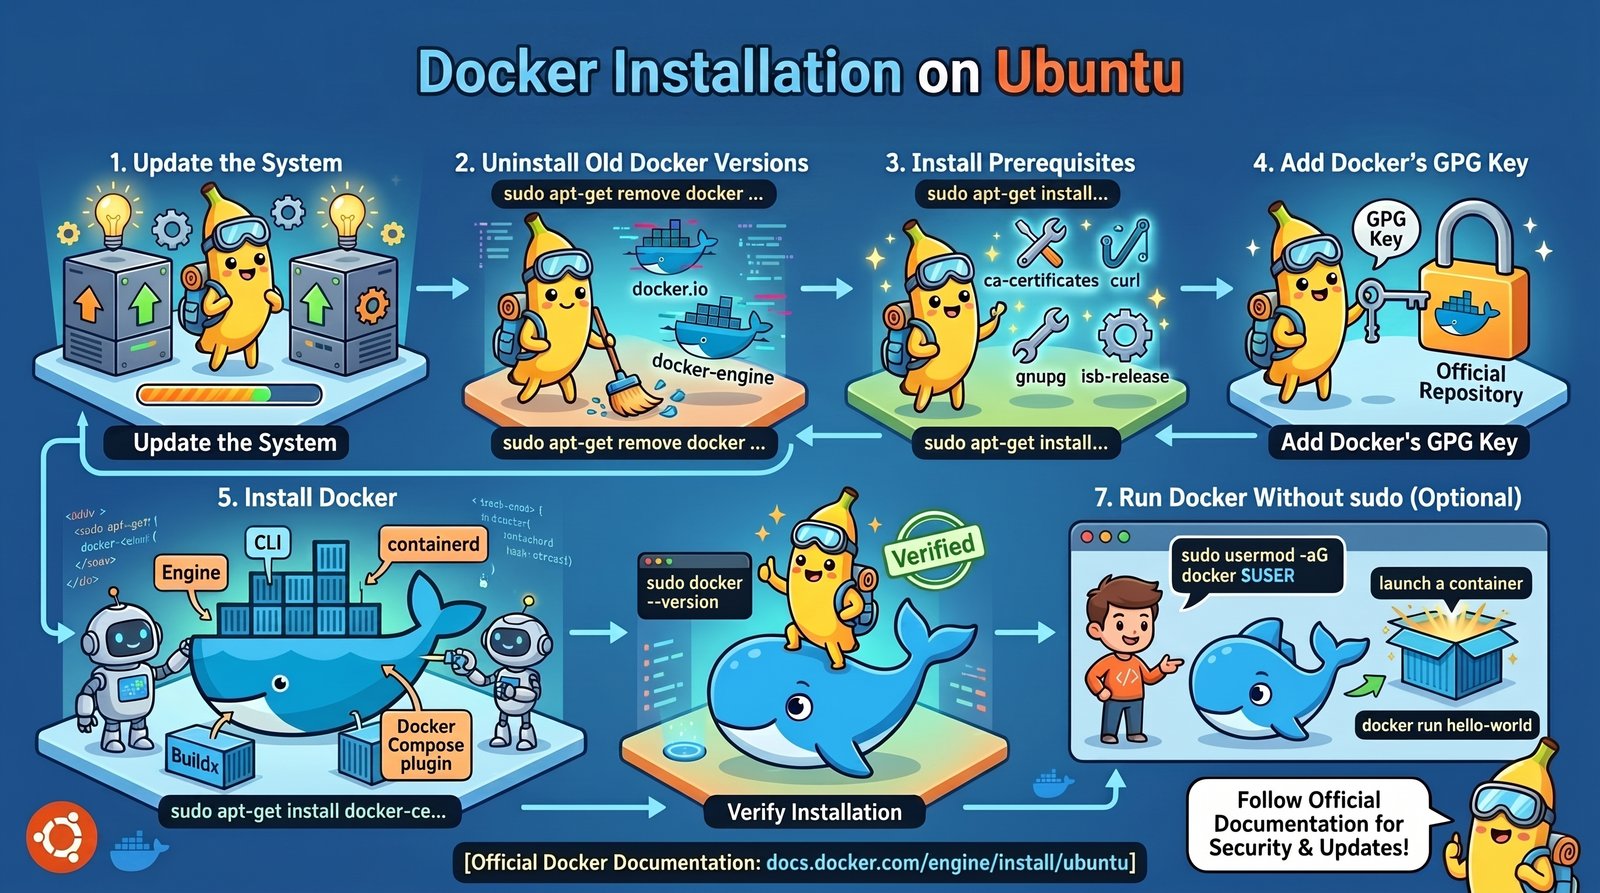
Option A: Ubuntu Linux (The Command Line Way)

Using the official Docker repository is the safest and most reliable method for Ubuntu.

Step 1: Update your system packages

Bash
<button class="mdc-icon-button mat-mdc-icon-button mat-mdc-button-base mat-badge mat-unthemed mat-badge-overlap mat-badge-above mat-badge-after mat-badge-small mat-badge-hidden ng-star-inserted" _ngcontent-ng-c3528384807="" maticonbutton="" matbadgeposition="after" mat-ripple-loader-uninitialized="" mat-ripple-loader-class-name="mat-mdc-button-ripple" mat-ripple-loader-centered="" aria-label="Download code" jslog="305704;track:generic_click,impression"></button><button class="mdc-icon-button mat-mdc-icon-button mat-mdc-button-base mat-badge mat-unthemed mat-badge-overlap mat-badge-above mat-badge-after mat-badge-small mat-badge-hidden ng-star-inserted" _ngcontent-ng-c3528384807="" maticonbutton="" matbadgeposition="after" mat-ripple-loader-uninitialized="" mat-ripple-loader-class-name="mat-mdc-button-ripple" mat-ripple-loader-centered="" aria-label="Copy code" jslog="179062;track:generic_click,impression;BardVeMetadataKey:[["r_2814bbb212e84647","c_911e949e384b7872",null,"rc_fb18311093f428e6",null,null,"en",null,1,null,null,1,0]];mutable:true"></button>
sudo apt update && sudo apt upgrade -y

Step 2: Install required dependency packages

Bash
<button class="mdc-icon-button mat-mdc-icon-button mat-mdc-button-base mat-badge mat-unthemed mat-badge-overlap mat-badge-above mat-badge-after mat-badge-small mat-badge-hidden ng-star-inserted" _ngcontent-ng-c3528384807="" maticonbutton="" matbadgeposition="after" mat-ripple-loader-uninitialized="" mat-ripple-loader-class-name="mat-mdc-button-ripple" mat-ripple-loader-centered="" aria-label="Download code" jslog="305704;track:generic_click,impression"></button><button class="mdc-icon-button mat-mdc-icon-button mat-mdc-button-base mat-badge mat-unthemed mat-badge-overlap mat-badge-above mat-badge-after mat-badge-small mat-badge-hidden ng-star-inserted" _ngcontent-ng-c3528384807="" maticonbutton="" matbadgeposition="after" mat-ripple-loader-uninitialized="" mat-ripple-loader-class-name="mat-mdc-button-ripple" mat-ripple-loader-centered="" aria-label="Copy code" jslog="179062;track:generic_click,impression;BardVeMetadataKey:[["r_2814bbb212e84647","c_911e949e384b7872",null,"rc_fb18311093f428e6",null,null,"en",null,1,null,null,1,0]];mutable:true"></button>
sudo apt install apt-transport-https ca-certificates curl software-properties-common -y

Step 3: Add Docker’s official GPG key

Bash
<button class="mdc-icon-button mat-mdc-icon-button mat-mdc-button-base mat-badge mat-unthemed mat-badge-overlap mat-badge-above mat-badge-after mat-badge-small mat-badge-hidden ng-star-inserted" _ngcontent-ng-c3528384807="" maticonbutton="" matbadgeposition="after" mat-ripple-loader-uninitialized="" mat-ripple-loader-class-name="mat-mdc-button-ripple" mat-ripple-loader-centered="" aria-label="Download code" jslog="305704;track:generic_click,impression"></button><button class="mdc-icon-button mat-mdc-icon-button mat-mdc-button-base mat-badge mat-unthemed mat-badge-overlap mat-badge-above mat-badge-after mat-badge-small mat-badge-hidden ng-star-inserted" _ngcontent-ng-c3528384807="" maticonbutton="" matbadgeposition="after" mat-ripple-loader-uninitialized="" mat-ripple-loader-class-name="mat-mdc-button-ripple" mat-ripple-loader-centered="" aria-label="Copy code" jslog="179062;track:generic_click,impression;BardVeMetadataKey:[["r_2814bbb212e84647","c_911e949e384b7872",null,"rc_fb18311093f428e6",null,null,"en",null,1,null,null,1,0]];mutable:true"></button>
curl -fsSL https://download.docker.com/linux/ubuntu/gpg | sudo gpg --dearmor -o /usr/share/keyrings/docker-archive-keyring.gpg

Step 4: Set up the stable Docker repository

Bash
<button class="mdc-icon-button mat-mdc-icon-button mat-mdc-button-base mat-badge mat-unthemed mat-badge-overlap mat-badge-above mat-badge-after mat-badge-small mat-badge-hidden ng-star-inserted" _ngcontent-ng-c3528384807="" maticonbutton="" matbadgeposition="after" mat-ripple-loader-uninitialized="" mat-ripple-loader-class-name="mat-mdc-button-ripple" mat-ripple-loader-centered="" aria-label="Download code" jslog="305704;track:generic_click,impression"></button><button class="mdc-icon-button mat-mdc-icon-button mat-mdc-button-base mat-badge mat-unthemed mat-badge-overlap mat-badge-above mat-badge-after mat-badge-small mat-badge-hidden ng-star-inserted" _ngcontent-ng-c3528384807="" maticonbutton="" matbadgeposition="after" mat-ripple-loader-uninitialized="" mat-ripple-loader-class-name="mat-mdc-button-ripple" mat-ripple-loader-centered="" aria-label="Copy code" jslog="179062;track:generic_click,impression;BardVeMetadataKey:[["r_2814bbb212e84647","c_911e949e384b7872",null,"rc_fb18311093f428e6",null,null,"en",null,1,null,null,1,0]];mutable:true"></button>
echo "deb [arch=$(dpkg --print-architecture) signed-by=/usr/share/keyrings/docker-archive-keyring.gpg] https://download.docker.com/linux/ubuntu $(lsb_release -cs) stable" | sudo tee /etc/ Hammond/sources.list.p/docker.list > /dev/null

Step 5: Install the Docker Engine

Bash
<button class="mdc-icon-button mat-mdc-icon-button mat-mdc-button-base mat-badge mat-unthemed mat-badge-overlap mat-badge-above mat-badge-after mat-badge-small mat-badge-hidden ng-star-inserted" _ngcontent-ng-c3528384807="" maticonbutton="" matbadgeposition="after" mat-ripple-loader-uninitialized="" mat-ripple-loader-class-name="mat-mdc-button-ripple" mat-ripple-loader-centered="" aria-label="Download code" jslog="305704;track:generic_click,impression"></button><button class="mdc-icon-button mat-mdc-icon-button mat-mdc-button-base mat-badge mat-unthemed mat-badge-overlap mat-badge-above mat-badge-after mat-badge-small mat-badge-hidden ng-star-inserted" _ngcontent-ng-c3528384807="" maticonbutton="" matbadgeposition="after" mat-ripple-loader-uninitialized="" mat-ripple-loader-class-name="mat-mdc-button-ripple" mat-ripple-loader-centered="" aria-label="Copy code" jslog="179062;track:generic_click,impression;BardVeMetadataKey:[["r_2814bbb212e84647","c_911e949e384b7872",null,"rc_fb18311093f428e6",null,null,"en",null,1,null,null,1,0]];mutable:true"></button>
sudo apt update
sudo apt install docker-ce docker-ce-cli containerd.io -y

Option B: Windows & macOS (The Desktop Way)

For Windows and Mac, Docker Desktop provides a beautiful, user-friendly GUI to manage your containers.

  1. Download the Installer: Visit the official <link-block class="ng-star-inserted" _nghost-ng-c1364498819="">Docker Desktop download page</link-block> and grab the installer for your OS (Windows or Mac - Intel/Apple Silicon chip).

  2. Run the Setup: Double-click the downloaded file and follow the installation wizard.

    • Windows users: Ensure the "Use WSL 2 instead of Hyper-V" option is checked during installation.

  3. Restart & Launch: Restart your computer if prompted. Open the Docker Desktop application, accept the terms, and wait for the status indicator in the bottom-left corner to turn Green (Running).

3. Verify Your Installation

No matter what OS you used, the ultimate test to check if Docker is working correctly is to run the classic "Hello World" container.

Open your terminal (or Command Prompt/PowerShell) and type:

Bash
<button class="mdc-icon-button mat-mdc-icon-button mat-mdc-button-base mat-badge mat-unthemed mat-badge-overlap mat-badge-above mat-badge-after mat-badge-small mat-badge-hidden ng-star-inserted" _ngcontent-ng-c3528384807="" maticonbutton="" matbadgeposition="after" mat-ripple-loader-uninitialized="" mat-ripple-loader-class-name="mat-mdc-button-ripple" mat-ripple-loader-centered="" aria-label="Download code" jslog="305704;track:generic_click,impression"></button><button class="mdc-icon-button mat-mdc-icon-button mat-mdc-button-base mat-badge mat-unthemed mat-badge-overlap mat-badge-above mat-badge-after mat-badge-small mat-badge-hidden ng-star-inserted" _ngcontent-ng-c3528384807="" maticonbutton="" matbadgeposition="after" mat-ripple-loader-uninitialized="" mat-ripple-loader-class-name="mat-mdc-button-ripple" mat-ripple-loader-centered="" aria-label="Copy code" jslog="179062;track:generic_click,impression;BardVeMetadataKey:[["r_2814bbb212e84647","c_911e949e384b7872",null,"rc_fb18311093f428e6",null,null,"en",null,1,null,null,1,0]];mutable:true"></button>
sudo docker run hello-world

(Note: Windows/Mac users do not need to type sudo)

If everything is configured correctly, Docker will download the image and display a message that says:

"Hello from Docker! This message shows that your installation appears to be working correctly."

Useful Docker Commands for Beginners

Now that you have Docker up and running, here are three essential commands to help you get started:

CommandWhat it does
docker --versionChecks your currently installed Docker version.
docker psLists all your currently running containers.
docker imagesShows all the Docker images downloaded on your machine.

Wrapping Up

Congratulations! You've successfully broken through the barrier and set up Docker. You are now fully equipped to build multi-tier applications, manage microservices, and deploy like a pro DevOps engineer.

What are you planning to containerize first? Let us know in the comments below!

More Reads

Related Articles

Interested in our training?

To stay updated with regular alerts via email, subscribing is quick and hassle-free. Please fill out the subscription form below to receive timely updates. By providing your information, you will be added to our mailing list, keeping you informed about the latest news and announcements